Monday, September 23, 2013

Barn Falliday Decor


In honor of today being the second day of the Falliday season (no one gets excited about the second day of stuff, so I wanted to),  I figured that it was about time I showed ya'll our barn's autumn decor. Because we are going to be out of town much of this season, I really tried to use mostly items that we already had lying around the house or in our local fields.  We did splurge on a few little 99 cent pumpkins and a couple branches (look out, big spenders here). Also, I didn't want to get a bunch of large pumpkins like last year, only to have them rot away while we are on vacation. Nothing like coming home to a bunch of moldy, rotten pumpkins to get you in the holiday spirit! Anyhow, at the end of this post I included a few pictures from our barn last fall, so you can see some of the spaces I didn't do (because of the pumpkin situation) this year. 
Since it's been so dark and cold in our corner of the world, I wanted to use a lot of deep, warm fall colors to keep our barn nice and cozy!
Okay,  enough of my blabbing...on to the tour we go! 


I love painted pumpkins and plan on doing large silhouette ones next year!


For a tutorial on this simple centerpiece below, click here!

For a tutorial on these DIY Industrial (wine lover's) pumpkins, click here!

To see a little bit of last year's decor, click here

\
For more Falliday posts, click here, and scroll down to the fall section! 

Have you been decking your halls with fall bling too?
Gotta run, I am off to bake some low carb pumpkin bars...
Tchuss! 

Linking up to:


 Savvy Southern Style

Saturday, September 21, 2013

Ombre, Ombre, Ombre Series! {DIY Ombre Drapes}


What is up, ombre hombres!! I hope you all are in as gooda' mood as I am! After what felt like endless days of darkness here in Germany, we are finally getting some sun! Das ist tre fabulous, ja! That was my GerFrenchEnglish (my language of choice). I have also been decking my halls with a little touch of Fall decor. The leaves around our hills are starting to turn, and our village smells of wood burning ovens. Ahhh the warm, crisp scent of fall is so beautiful and thick it's almost tangible....edible! After this tutorial, I promise I will get some autumn posts up... 
So, this is part two of my mini ombre series. This time around, we are moving on to bigger things...
DRAPES!!! If you haven't read my tutorial for how to ombre napkins, click here to read it now. To dye the drapes, you basically do the exact same thing as my tutorial for napkins, just on a larger scale with a few modifications. I am seriously in love with ombre dying things... it is beyond easy. I anticipate ombre-ing pillows, clothes, maybe some dish towels. 


I purchased a pair of cheap-o drapes from Ikea for 14.00 Euro, that's less than $20. Ikea is a great place to get decent textiles for a really low price. After you found the drapes you want to dye, you are going to prepare your dye bath and wash your fabric like we did for the napkins. I would recommend using 1-1/2 to 2 boxes of the die for this much fabric. I used Rit dye in "Pearl Grey" that I brought home from The States. I don't believe you can get Rit in Germany, but you can probably order it from America. If you don't feel like doing that and you are inpatient like myself, one of my wonderful readers mentioned that you can get a dye called "Simplicol" here in Germany. 
You will need to line up the tops of both of your drapes and also the bottoms of both your drapes, so the dye level will be the same for each drape. I only wanted to ombre the bottom of my drapes. I wanted it to appear as though they are a painter's drop-cloth that is absorbing paint slowly. 

Like with the napkins, you will dip the drapes in as far up as you want the ombre to go, for a few seconds... I recommend 3-5 seconds. Pull out a third of that, leave the other 2/3's in the dye for about 15-30 seconds to a few minutes (depending on how your fabric is taking the dye). You will want to make sure that you keep the fabric down in the dye by pushing it in. Pull another third out and leave the very bottom of the drapes in for about 15 minutes. The longer you leave it in, the more saturated color you will get. 

As you pull the fabric out of the dye bath, your fabric will get a soft faded watercolored  look. I have it draped over a bowl to catch dye-water dripping off the fabric, so it doesn't get all over my butcher's block.

My home has turned into a dye factory...

Once it is done soaking in the dye, you will rinse the drapes out with hot water, (just like we did with the napkins) holding the lightest part up so the dye doesn't rinse out into the white. You will rinse the drapes, until the water runs clear. Wash with detergent in hot water, dry and your drapes are good to go! 

Again, I left the drapes crinkly so it has that "drop cloth" look. I love how it makes the drapes informal and gives the soft ombre depth and texture. 

For under $25, you have a pair of gorgeous, custom, ombre drapes! At that price, they can be dyed and changed seasonally... I may just have to do that. What will you be dying this weekend?

DON'T FORGET to enter my amazing giveaway from Jen at City Farmhouse!  Click the picture below to enter! 


P.S. If you like my fabulous Lindsay Letter's deer art, click here! 

Wednesday, September 18, 2013

Ombre, Ombre, Ombre Series! {DIY Ombre Napkins}


The word ombre (yes, yes, I know the e has a little dash over it, but my font wont let me do it...) is French and it means" to shade". Ombre is gaining popularity all over the world from hair to clothes and has hit the design scene too. Ombre is such a gorgeous look, It appears to be watercolored...I just adore it! It is a great look that can be added in any style home, and is easy to switch out seasonally! These napkins make beautiful gifts too! I decided to play around with the technique myself. I went from dying a few napkins, to a tablecloth then got carried away and dyed my drapes (and accidentally my white dog...oops). 
I created a tutorial for you all, so that you can ombre away with me. You will want to start with something small so you can get the technique down. It is super easy, folks and isn't very messy at all if you prep correctly!
I think napkins, a scarf or a table runner are the best things to begin with...

Let's Begin, Sha'll We?
The first thing you will want to do is wash your fabric so that it will accept the dye. 
After you wash your fabric, start out by preparing your dye according to the instructions on the dye box. It will call for extremely hot water and may call for salt.  I also made some wine colored napkins as you can see from the color on the box below! For those of you that live in Europe, I purchased the dye while in The States. If you can't find it locally, try ordering it online. 
Once everything is prepped, you will dip your fabric in warm water.

If you want your napkin to be gradient from both ends when open (it will appear only one ended when folded) like the picture below.....
...then you will start by folding your napkin or runner in half.  
You will then 
fold it a few times vertically so that it looks like a hot dog.

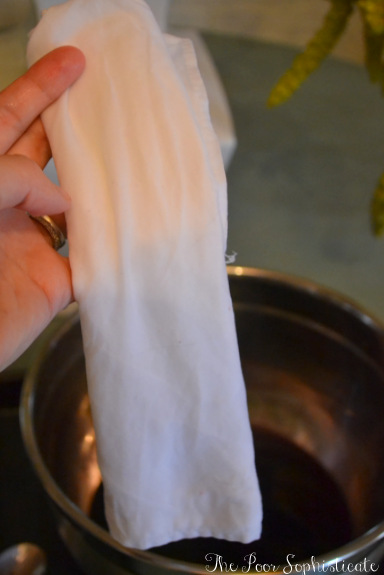
You will dip your napkin 2/3's of the way in the dye for about 3 seconds. Pull it out of the dye and dip about 1/3 of the way in for about 15-30 seconds depending on how dark you want it. Then pull that out and leave just the tips in for about 15 minutes. I did this in blue than did the same process in green to create an aqua color. The longer you keep it in the dye, the more saturated color you will get.

 If the sun exists in your country, you can let it cure in the sun. I gave it a shot but not much happened since it was just cold and wet out. 
Penny is guarding my napkins for me...

Once your finished dying you will rinse your napkins out, holding the lightest part up so the stain doesn't drip into the white part of the fabric. You will rinse the dye away until the water runs clear. Wash it in hot water with detergent and your napkins will be all ready for your next soiree!


I ironed them for you all, but I especially love how they look crinkly... It gives it more depth and texture! It reminds me of the ocean.., So lovely!  I think my next round will be fall colors, and will look like a sunset! 

Next up, I will be giving a tutorial on how to ombre your drapes! Stay tuned, my loves!
Will you be ombre-ing anything today?? It's actually quite simple, so get to it,  creative one's.

OOooooo, one last thing, don't forget to enter my epic giveaway by clicking the picture below!


Related Posts Plugin for WordPress, Blogger...