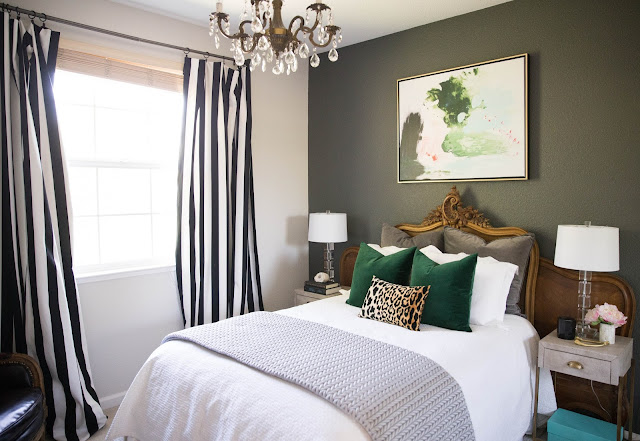
For some reason, my bedroom is consistently the last space in my home that I finish. I believe it is because I am so used to moving, that I try to get the areas in my home that I will be entertaining in completed first.
Since I have been renting the same place, my loft, for a couple of years now and I plan on staying here for a bit. Now, I finally finished my bedroom, and oh boy, it is so important to have a "finished" and peaceful place to sleep, shut down and unwind in...Let's be real, in my home, a room is always a work in progress. I am loving the bold mix of modern with ultra traditional.
I scored this 100 year old, Louis XV, twin headboard in France for $100 right before leaving Germany, and finally had my master plan for this piece executed. Since I won't be having kiddos anytime in the near future and larger European bed sizes don't convert to our American bed sizes, I decided I would butcher this gorgeous thang and give it new life. I am typically not a fan of modifying antiques but knew this bed would get FAR more use and would be appreciated and honored more if I did cut it, than if it just sat in my garage, waiting for a kid to come along who wouldn't appreciate it's beauty as much as I would anyhow. Sorry (not sorry), future, unborn child.
I want to encourage you guys to not be limited by what/how you "should" be using an item for but to re-imagine or re-engineer how a piece can evolve and be used. I only have a full mattress at the moment and wanted this headboard to fit that but to also potentially fit up to a king sized bed in the future. In order to make that happen, us antique-loving, Europe living expats have been known to slice a twin footboard in half and mount each half to either side of the headboard. It makes for a ridiculously dramatic bed and at a stupid-cheap price. The best part about it, is it looks great with ANY size bed and is totally custom and unique looking.
Thankfully, my footboard had a line down the middle, so it was an easy line to cut on. This is helpful for lazy folks.
In order to make it as flush with the headboard as possible, I had the moulding on the back of the headboard's feet cut off vertically.
By the way, do you ever wonder why fake antiques have all the little holes in them? It is trying to emulate the wood worm damage in real antiques as seen below, to make it look more authentic. Wood worm is not a good thing and will shred your gorgeous wood. This piece along with all my antiques were treated before bringing it back to the U.S.
In order to attach your footboard halves to the headboard, you will flip your headboard over and mount each half to either side (from the back). This will make the centerpiece protrude a little bit more but it adds a dramatic effect. These were attached with long screws.
The finished product is stunning. I like the look of having the nightstands in front of the extra large headboard as it gives it a "hotel look". When I eventually get a king bed, I will mount the headboard higher on the wall and know it will look spectacular. This incredibly, inexpensive headboard is quite possibly one of my favorite pieces of furniture in my home.
As you can see from my coffee bar armoire, I like to do unexpected things with my antiques and use them in ways that are totally different and unassuming. If you missed my Christmas decor (which you totally did because I was ultra late posting pics, because of a technical problem), click the image below!
I want to thank Rachel and Ari from Ari and Faye Photography, for taking these beautiful images of my bed!
I am off to sip some coffee and get more work done. So tell me, dear friends...What pieces in your home can be reworked or reimagined??


